

|
[ บทความ : ทดลองใช้บอร์ด ET-DIO ตอนที่ 2 ] - ขับ 7-Segment 6 หลัก |
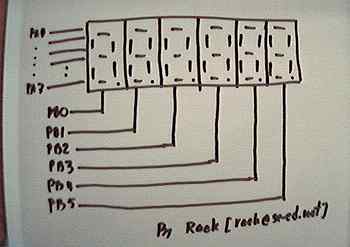
จากบทความครั้งก่อน [ อ่านบทความเก่า ] เป็นการขับหลอด LED จำนวน 8 ดวง โดยผ่านทาง 8255 ของบอร์ด ET-DIO คราวนี้เราจะลองมาขับ 7-Segment ดูบ้าง แต่เราจะเพิ่มความซับซ้อน คือ เราจะขับ 7-Segment จำนวน 6 หลักด้วยกัน ... ดังนั้น วงจรของบอร์ดทดลองจะเป็นดังนี้ครับ

จากวงจรในบทความนี้เมื่อเราเอาโปรแกรมของบทความตอนที่แล้วมา run จะได้ผลลัพธ์ของการแสดงผลออกมาเป็นดังนี้ครับ
จะเห็นว่า ถ้าเราเอาโปรแกรมเก่ามาใช้นั้น ผลการทำงานจะไม่ถูกต้อง เพราะโครงสร้างการแสดงผลของ 7-segment ถึงแม้ จะมี LED อยู่ในตัวเองเป็นจำนวน 8 ก็ตาม แต่กาารวางตำแหน่งนั้นเปลี่ยนไป ทั้งนี้เพราะ 7-segment มีหน้าที่สื่อถึงตัวเลขเป็นหลัก ดังนั้น เราก็จะใช้ 7-Segment ในการแสดงค่าตัวเลขต่างๆ นั่นเอง [ อ่านบทความเกี่ยวกับ 7-Segment ] ... ตัวอย่างโปรแกรม Turbo C version 2.01 เป็นดังนี้ครับ
	/*
	        	Filename	:       	dio8255.c
		Author	:	Supachai Budsartij
        		Date    	:       	26 ก.ค. 2543
        		Compiler	:       	Turbo C Version 2.01
		Hardware	:	ETT-DIO Card
        		Platform	:       	MS-DOS

		Tester 	:	AMD K6-II 500MHz
                        			RAM     64MB
                        			Harddisk 1x10.2GB, 1x1.2GB
                        			VGA 3Dfx Banshee
                        			Sound Creative AWE64 [ISA]

		Note	:	Drive Scan display [6 Digit 7-Segment] with Port A [data] and
                        	Port B [selector].
	 */
	#include <conio.h>
	#include <stdio.h>

	#define DIO_8255PA		0x300
	#define DIO_8255PB		0x301
	#define DIO_8255PC		0x302
	#define DIO_8255CTRL		0x303

	void out_8255(int port_no, unsigned char data)
	{
	    outportb(port_no, data);
	}

	void main(void)
	{
	    unsigned char pattern[] = {0x3F,0x06,0x5B,0x4F,0x66,0x6D};
	    unsigned char select[] = {0xFE, 0xFD, 0xFB, 0xF7, 0xEF, 0xDF};
	    unsigned char max_patt = sizeof(pattern);
	    unsigned char element = 0x00;
	    unsigned char selected = 0x00;

	    out_8255(DIO_8255CTRL,0x80);

	    while (!kbhit()) {
	         out_8255(DIO_8255PB,select[5-selected]);
	         out_8255(DIO_8255PA,pattern[element]);

	         if (selected == 0x05) {
	             selected = 0x00;
	         }
	         else {
	             selected++;
	         }
	         if (element == max_patt-1) {
	             element = 0;
	         }
	         else {
	             element++;
	         }

		 delay(10000);
		 out_8255(DIO_8255PA,0x00);
	    }
	    out_8255(DIO_8255PA,0x00);
	}
ด้านล่างเป็นตัวอย่างโปรแกรมที่เขียนด้วย Visual C++ version 5 ครับ
	/*
		Filename	:	dio8255seg.c
		Author	:	Supachai Budsartij
		Date	:	20 ก.ค. 2543
		Compiler	:	Visual C++ Version 5
		Hardware:	ETT-DIO Card
		Platform	:	Win32 [Console]

		Tester 	:	AMD K6-II 500MHz
					RAM	64MB
					Harddisk 1x10.2GB, 1x1.2GB
					VGA 3Dfx Banshee
					Sound Creative SB32 [ISA]

		Note	:	Drive Scan display [6 Digit 7-Segment] with Port A [data] and
				Port B [select].
	 */
	#include <conio.h>
	#include <stdio.h>

	#define DIO_8255PA		0x300
	#define DIO_8255PB		0x301
	#define DIO_8255PC		0x302
	#define DIO_8255CTRL		0x303

	void delay_8255(short dly)
	{
		while (dly-- > 0);
	}

	void out_8255(int port_no, unsigned char data)
	{
	    _outp((unsigned short)port_no, (int)data);
	}

	void main(void)
	{
	    unsigned char pattern[] = {0x3F,0x06,0x5B,0x4F,0x66,0x6D};//,0x7D,0x07,0x7F,0x6F,0x77,0x7C,0x39,0x5E,0x79,0x71};
	    unsigned char select[] = {0xFE, 0xFD, 0xFB, 0xF7, 0xEF, 0xDF};
	    unsigned char max_patt = sizeof(pattern);
	    unsigned char element = 0x00;
	    unsigned char selected = 0x00;

	    out_8255(DIO_8255CTRL,0x80);

	    while (!kbhit()) {
			out_8255(DIO_8255PB,select[5-selected]);
			out_8255(DIO_8255PA,pattern[element]);

			if (selected == 0x05) {
				selected = 0x00;
			}
			else {
				selected++;
			}
			if (element == max_patt-1) {
				element = 0;
			}
			else {
				element++;
			}
			delay_8255(30000); // dependence with Machine speed.

			out_8255(DIO_8255PA,0x00);

	    }
		out_8255(DIO_8255PA,0x00);
	}
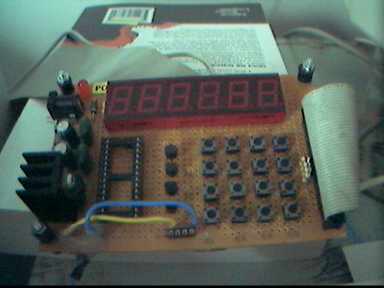
รูปของบอร์ดทดลองเป็นดังนี้

ด้านล่างเป็นรูปแสดงผลการทำงานของโปรแกรมครับ